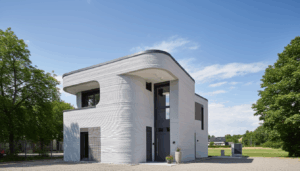
The image is captivating and futuristic. A robotic arm gracefully extrudes ribbons of concrete, building the walls of a 3D-printed house from the ground up, layer by layer. It’s a scene that seems to leap directly from science fiction. Yet, across the globe, this is becoming a tangible reality. While our first article explored 3D printing’s revolutionary potential, this post will pull back the curtain on the practical process.
How does a digital file become a physical, livable home? What are the actual steps involved? The journey from concept to concrete is a carefully orchestrated blend of digital design, material science, and robotic automation. In addition, it requires skilled human craftsmanship. The process is systematic and surprisingly logical. Furthermore, it is redefining the very meaning of “ground-up construction.” This guide provides a detailed walkthrough of that journey. Ultimately, it transforms the abstract concept of a 3D-printed house into a clear reality.
Phase 1: Design and Preparation, featuring 3D-printed components
Long before the first bead of concrete appears, the process starts in the digital world. This preparatory phase is arguably the most critical. This is because the precision established here dictates the project’s success.
Architectural and Structural Design
It all begins with a 3D model. Architects and engineers create this model using BIM or advanced CAD software. However, designing for additive manufacturing requires a slightly different mindset. Designers must optimize wall thicknesses, overhang angles, and the integration of structural elements for the printing process. For example, they typically design walls with hollow cavities. This saves material. Additionally, it creates channels for insulation and utilities. The structural engineer ensures the design can withstand all necessary loads. They also plan for integrating reinforcement that technicians will add during the print.
Slicing and Machine Code Generation
Once the 3D model is final, it is fed into specialized “slicing” software. This program digitally cuts the structure into thousands of thin, horizontal layers. Each layer represents one pass of the printer’s nozzle. Then, the software generates the final G-code. This specific language commands the printer’s movements, speed, and extrusion rate. Indeed, this file is the direct link between the architectural vision and the robotic action.
Material Science and Mix Design
The “ink” for a construction printer is a highly engineered marvel, not a standard bag of concrete. A team of specialists develops a specific mix design. They tailor it to the project’s location, climate, and structural needs. Factors like temperature and humidity heavily influence the material’s behavior. Therefore, the mix must be perfectly balanced to be:
- Pumpable: Fluid enough to travel through hoses without clogging.
- Extrudable: Able to be pushed through the nozzle in a consistent bead.
- Buildable: Stiff enough to immediately hold its shape and support subsequent layers. This careful calibration is essential for a successful print.
Site Preparation
While the digital work is underway, a crew readies the physical site conventionally. This includes surveying, excavation, and installing underground utilities. Next, workers pour a standard load-bearing foundation, typically a reinforced concrete slab. A crew will set up the 3D printer on this foundation. Then, the machine will print the house.
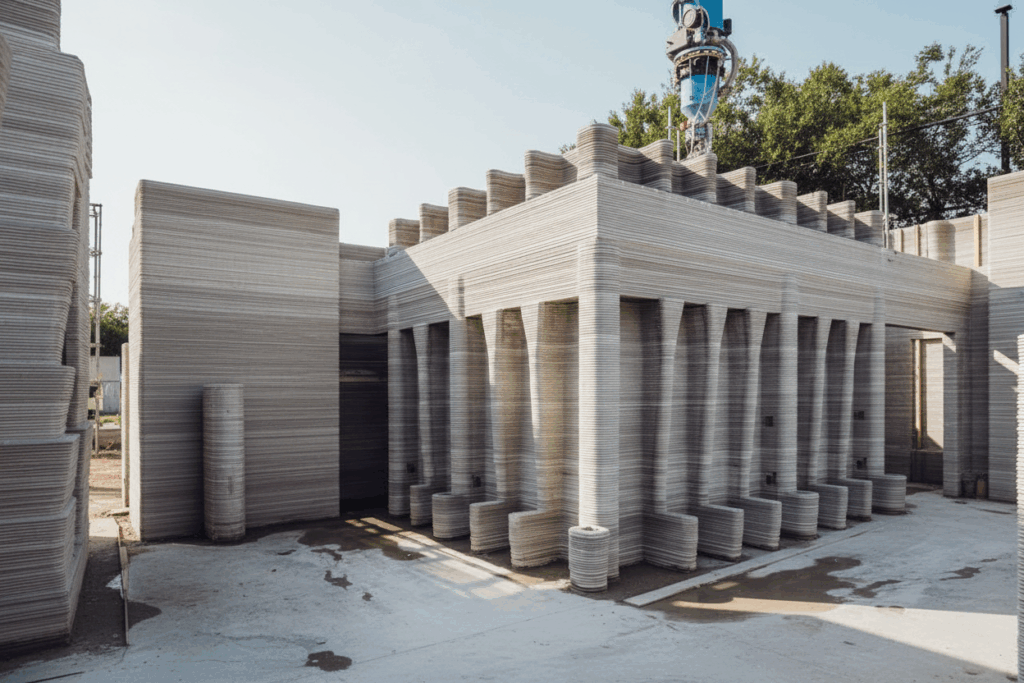
Phase 2: The Print – Creating the 3D-printed Structure through Extrusion
This is the phase where the digital plan becomes a 3D-printed physical form. With the foundation cured and G-code loaded, the printing process begins.
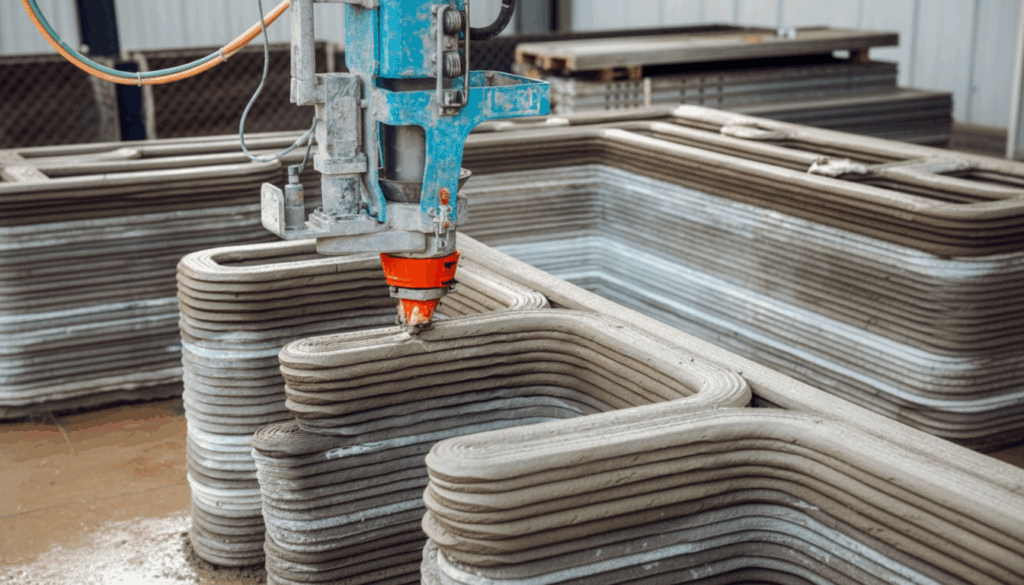
Machine Setup and Calibration
First, a crew assembles a large gantry-style printer over the slab. Alternatively, they fix a robotic arm in a position where it can reach the entire build area. The team then begins a critical calibration process. They ensure the printer is perfectly level. Its starting coordinates must also match the digital plan with sub-millimeter accuracy.
The Printing Process in Action
With the press of a button, the process starts. The nozzle moves to its starting point and begins extruding the first layer. A small crew of 2-3 technicians oversees the process as the printer follows the G-code path, laying down layer after layer. The speed is remarkable. For instance, a task that would take masons days can be extruded in just a few hours. The technicians monitor the process, ensuring material consistency.
Manual Intervention and Reinforcement
It’s a common misconception that the construction of 3D-printed buildings is entirely hands-off. In reality, it’s a collaborative effort between robot and human. To comply with modern building codes, technicians add reinforcement as the walls rise. At designated intervals, the printing is paused, allowing technicians to manually insert vertical sections of rebar into the wall cavities. They may also lay horizontal reinforcement on top of a layer before the next one is printed over it. Similarly, during a pause, technicians manually place pre-fabricated lintels above the openings for doors and windows.

Phase 3: The Post-Print Construction
Once the final layer of concrete is extruded and a crew removes the printer, what’s left is a robust structural shell. The final phase turns this printed shell into a complete home using conventional methods.
Roof, Doors, and Windows
First, workers prepare the top of the printed walls for the roofing system. Then, a crane lifts a standard roof truss system into place. Workers securely anchor it to the concrete walls. With the structure enclosed, workers install standard windows and doors into the perfectly dimensioned openings.
MEP and Insulation
The hollow cavities in the walls now serve their purpose. Electricians and plumbers can easily run wires and pipes through these pre-formed channels. This is a significant improvement over drilling through solid materials. Once all Mechanical, Electrical, and Plumbing (MEP) systems are in place, workers fill the cavities with spray foam insulation. As a result, this creates an airtight thermal envelope, making these homes exceptionally energy-efficient.
Interior and Exterior Finishing
The final step is to apply finishes. On the interior, workers can attach drywall to the concrete walls. Alternatively, they can smooth the unique, layered texture with plaster or leave it exposed. On the exterior, many finishing options are available. The concrete walls provide a durable substrate. Therefore, they can be painted, covered in stucco, or clad with brick, stone, or wood. As a result, a finished 3D-printed home can be visually indistinguishable from a conventional one but possess a far superior core structure.
Conclusion
The journey from a dream to a 3D-printed reality is a testament to modern efficiency. It is a systematic process that marries the precision of robotics with the necessary craft of skilled technicians. It proves that homebuilding can be faster and more materially efficient. In addition, it can offer greater design flexibility without sacrificing quality. As this technology matures, the path to a custom, durable home is becoming shorter and more accessible than ever before. This is a true revolution, realized one layer at a time.